


Brightspace
Brightspace by D2L is SD72’s official learning management system. The Online Learning Branch of the Ministry of Education & Child Care supports it.
Select a task below. Click any step screenshot to see it at full size.
Request a course shell
Get your principal’s approval before requesting a Brightspace course shell. There is a cost to use it.
Email servicedesk@sd72.bc.ca to create a ticket with the information below.
- Confirmation that your principal approved the request.
- The name of the course you want created.
- Whether you want to include WCLN course content.
WCLN course content
SD72 belongs to the Western Canadian Learning Network (WCLN), a group of school districts that supports distance, alternate, and blended learning.
WCLN offers Brightspace-ready content for most of the B.C. curriculum in Grades 4–12 at no additional cost to SD72. See the list of available WCLN courses.
Activate WCLN course content
Activate WCLN content once per course so you and your students can access it. If you can already see the lesson content, activation is complete.
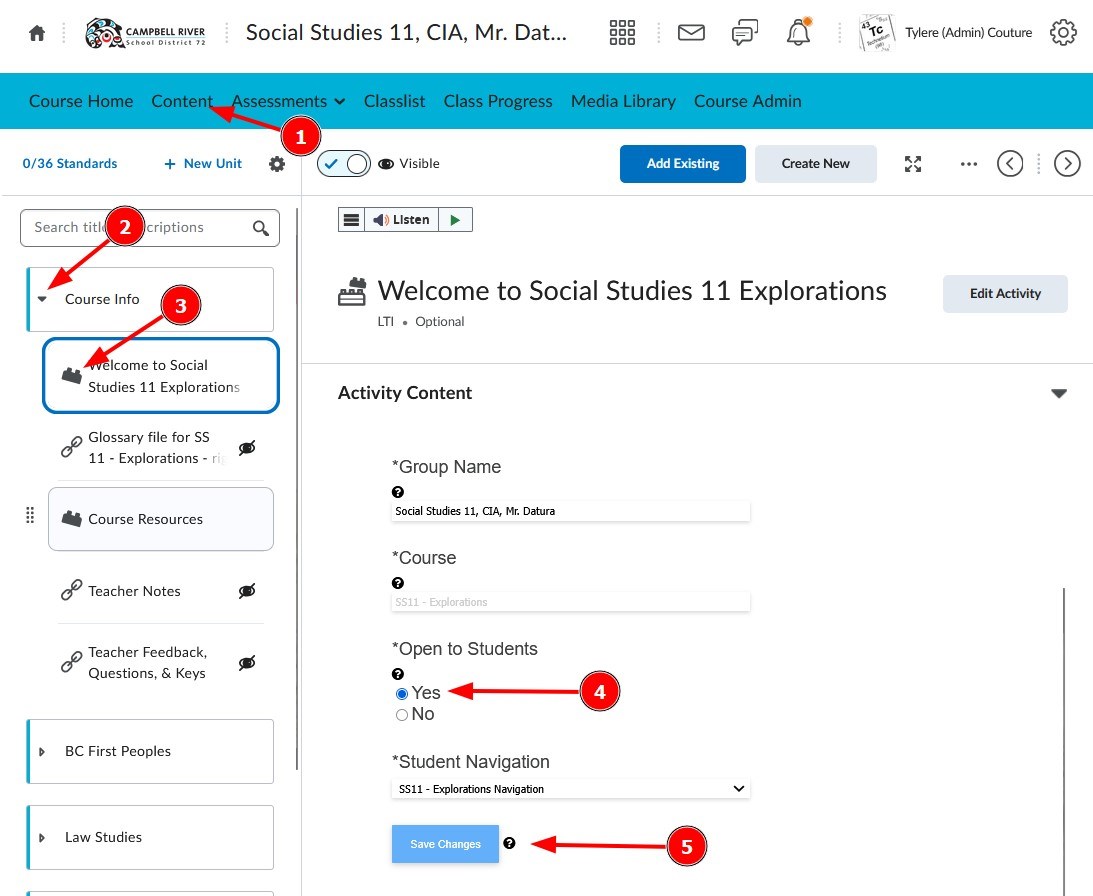
- Open the course and select Content in the top menu.
- Expand any unit.
- Open a lesson with a brick icon.
- Set Open to Students to Yes.
- Select Save Changes.
Find WCLN answer keys
- Sign in to the WCLN discussion forums. If you need an account, select Create new account near the bottom and follow the prompts.
- Scroll to the blue folder icons near the bottom. Open the folder for your subject.

- Scroll to the bottom to find the Learning Guide keys by unit. For example, the Math 4 Unit 1 key is MA4_LG_U1-KEY.docx.

Find WCLN corrections and ask questions
- Sign in to the WCLN discussion forums. If you need an account, select Create new account near the bottom and follow the prompts.
- Scroll to the forum for your specific course and open it.

- Browse the discussion topics for corrections and help with course content. Select Add discussion topic to post your own question.

Import a class list from MyEd
Use a MyEd export to enroll a whole class at once. To add a single student or a colleague, follow the steps to enroll someone individually.
Part 1. Export the class list from MyEd
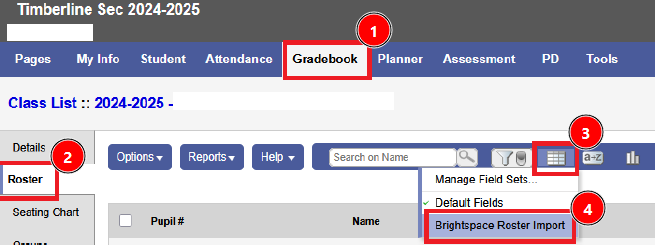
- Sign in to MyEd BC. Select Gradebook at the top and open the course whose class list you want to export.
- Select the Roster side tab.
- Click the Field set icon.
- Select Brightspace Roster Import.
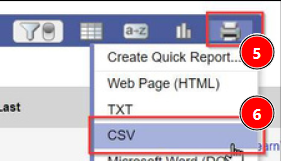
- Click the Print icon.
- Select CSV to download the file.
Part 2. Prepare the CSV file in Excel
- Open the downloaded file in Excel and accept the default import options if prompted.
- To the right of Email1, name column E Role. Enter Student in that column for every student.
- Name column F Password. Leave all cells below that heading blank.

- Save the file to your computer in CSV (.csv) format.
Part 3. Import the class list into Brightspace
- Sign in to Brightspace and open the course where you want to enroll the students.
- Open Classlist. Select Add Participants, then Import users from a file on your computer.
- Select Choose File, pick the CSV you prepared, and select Import.
- Select Done at the bottom.
Enroll students or staff individually
SD72 students and teachers already have Brightspace accounts. Open your course and add them as existing users.
- Open Classlist from the course menu.
- Select Add Participants.
- Select Add existing users.

- Enter the student’s or staff member’s name in the search box.
- Press Enter or select the search icon.
- Scroll to the search results and open Select a role beside the correct account.
- Choose Student or Teacher. If a staff member also has a parent account, use the staff account. Its Org Defined ID starts with S followed by eight digits, such as S12345678.
- Select the checkbox beside the user and click Enroll Selected Users.

Brightspace basics
Use this presentation to learn the essentials of working in Brightspace.
Additional Brightspace resources
 Teacher and student sign-in guide (PDF) Steps for signing in to SD72 Brightspace.
 Parent sign-in and password setup (PDF) A guide you can share with families.
 Interactive lessons with Creator+ Explore the interactive lesson tools built into Brightspace.
 Creating inclusive content in Brightspace Explore ways to make course content more accessible.

 Google Translate
